Your chatbot probably answers from more than your website: return policies, shipping FAQs, product sheets and internal help articles. Upload those documents and we test your chatbot against them too, so you find out whether it really gives customers the answers your business has written down. No website? You can test your chatbot with documents alone.
Before you start
- You need the Owner, Admin or Manager role in the workspace to add or remove documents.
- You need a website or a documents-only project. See Add your website, or follow step 1 below to create a project without a website.
- Supported files: PDF, Word (.docx), TXT, Markdown, CSV, JSON or HTML, up to 10 MB each. The number of documents you can keep depends on your plan.
Step by step
1. Create a documents-only project (only if you have no website)
Go to Websites → Add website, tick No website: test my chatbot with my own documents, enter a Name and click Add website & start crawl. We skip crawling, create the project and take you straight to its Documents tab. You can add a website URL later with Edit.
In the setup wizard, the same option is called No website? Test my chatbot with my own documents instead, followed by Create project.
2. Open the Documents tab
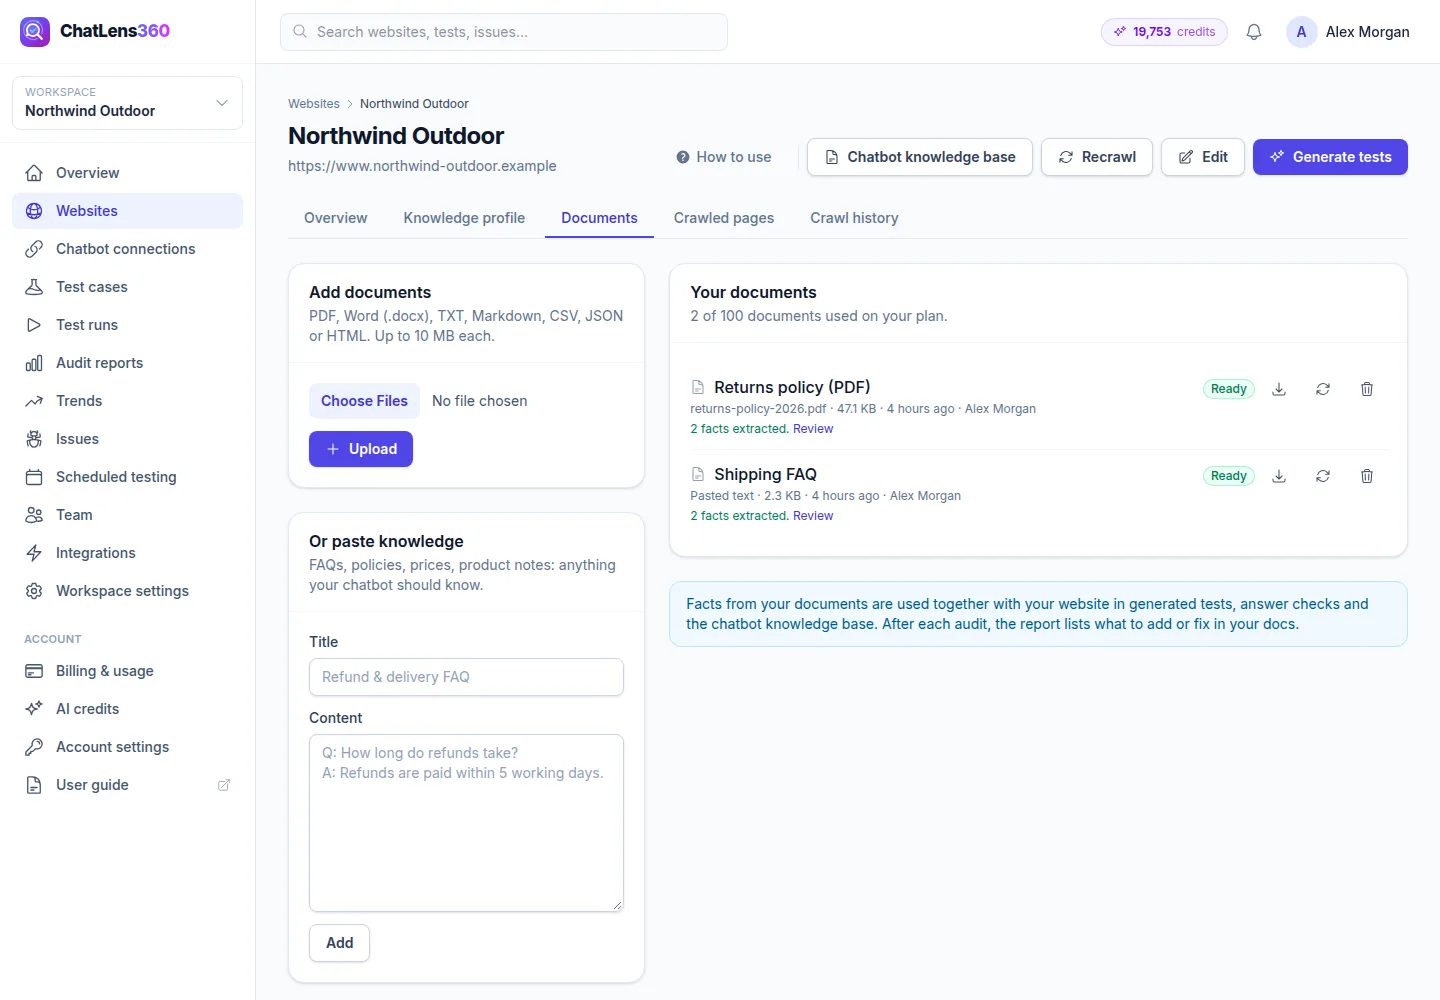
Click Websites, open your website or project and select the Documents tab. On the left you add knowledge, on the right you see Your documents and how many your plan allows.
3. Upload files
In the Add documents card, click the file picker, choose one or more files (up to 10 at a time) and click Upload. You see "Document added. We are reading it now." While we read the files, a banner shows Reading 1 document… and the page updates by itself.
4. Or paste knowledge
No file at hand? Use the Or paste knowledge card for FAQs, policies, prices or product notes. Enter a Title (for example "Refund & delivery FAQ"), paste the text into Content and click Add. A simple question-and-answer format works best:
Q: How long do refunds take?
A: Refunds are paid within 5 working days.
5. Check what we extracted
When a document is ready, its row shows how many facts we found, for example "12 facts extracted." Click Review to open the Knowledge profile tab, where facts from documents are marked From document. Edit or remove any fact that is wrong, just like facts from your website.
Each document row also shows its status and three buttons: download the original, read it again, and delete it. Deleting a document also removes the facts taken from it.
6. Resolve conflicts between your website and documents
If your website and a document say different things about the same topic, for example two different return windows, a card titled Your website and documents disagree appears. It shows both versions side by side. Your chatbot may give either answer, so update whichever source is out of date.
7. Run an audit
Facts from your documents are used together with your website in generated tests, answer checks and the chatbot knowledge base. Generate tests or run an audit as usual. After each audit, the report includes Suggested updates to your docs & knowledge base, listing what to add or fix in your documents.
Tips
- Upload the documents your chatbot is actually trained on or connected to. That way the audit checks what customers really get.
- Keep one topic per document where you can. Clear, focused documents produce cleaner facts and clearer findings.
- Fix conflicts quickly. Two versions of a refund policy is a common cause of wrong answers and unhappy customers.
- After you update a policy, delete the old document and upload the new one so audits use the current version.
- Prefer text-based PDFs. Exported PDFs read much better than scans.
Troubleshooting
- "No text found in this PDF." — The PDF is probably a scan (images of pages). Export a text PDF from the original file, or paste the text instead.
- "This Word file could not be opened." — Save it as .docx again, or paste the text instead.
- "Use PDF, Word (.docx), TXT, Markdown, CSV, JSON or HTML files." — Convert the file to one of these formats. Older .doc files need to be saved as .docx.
- "This document could not be processed. Please try again." — Click the read-again button on the document row. If it fails again, paste the text instead.
- "Your plan allows … Upgrade your plan to add more." — You have reached your plan's document limit. Delete documents you no longer need, or upgrade.
Related guides
Still stuck? Contact us and we will help, or let our team set it up and fix it for you.