The blog brings visitors to your site from search and shows them you understand chatbot quality. This guide shows superadmins how to write, schedule and tag posts, and how to set up cover images and SEO fields so each post looks good in search results and when shared.
Before you start
- You need a superadmin account. Open the admin panel from Superadmin in the app sidebar.
- Posts are written in Markdown. You only need the basics:
##for section headings,**bold**, lists and links.
Step by step
1. Open the post list
In the admin sidebar, click Blog. The Blog posts page lists every post with its Title, web address, Category, Status and Publish date.
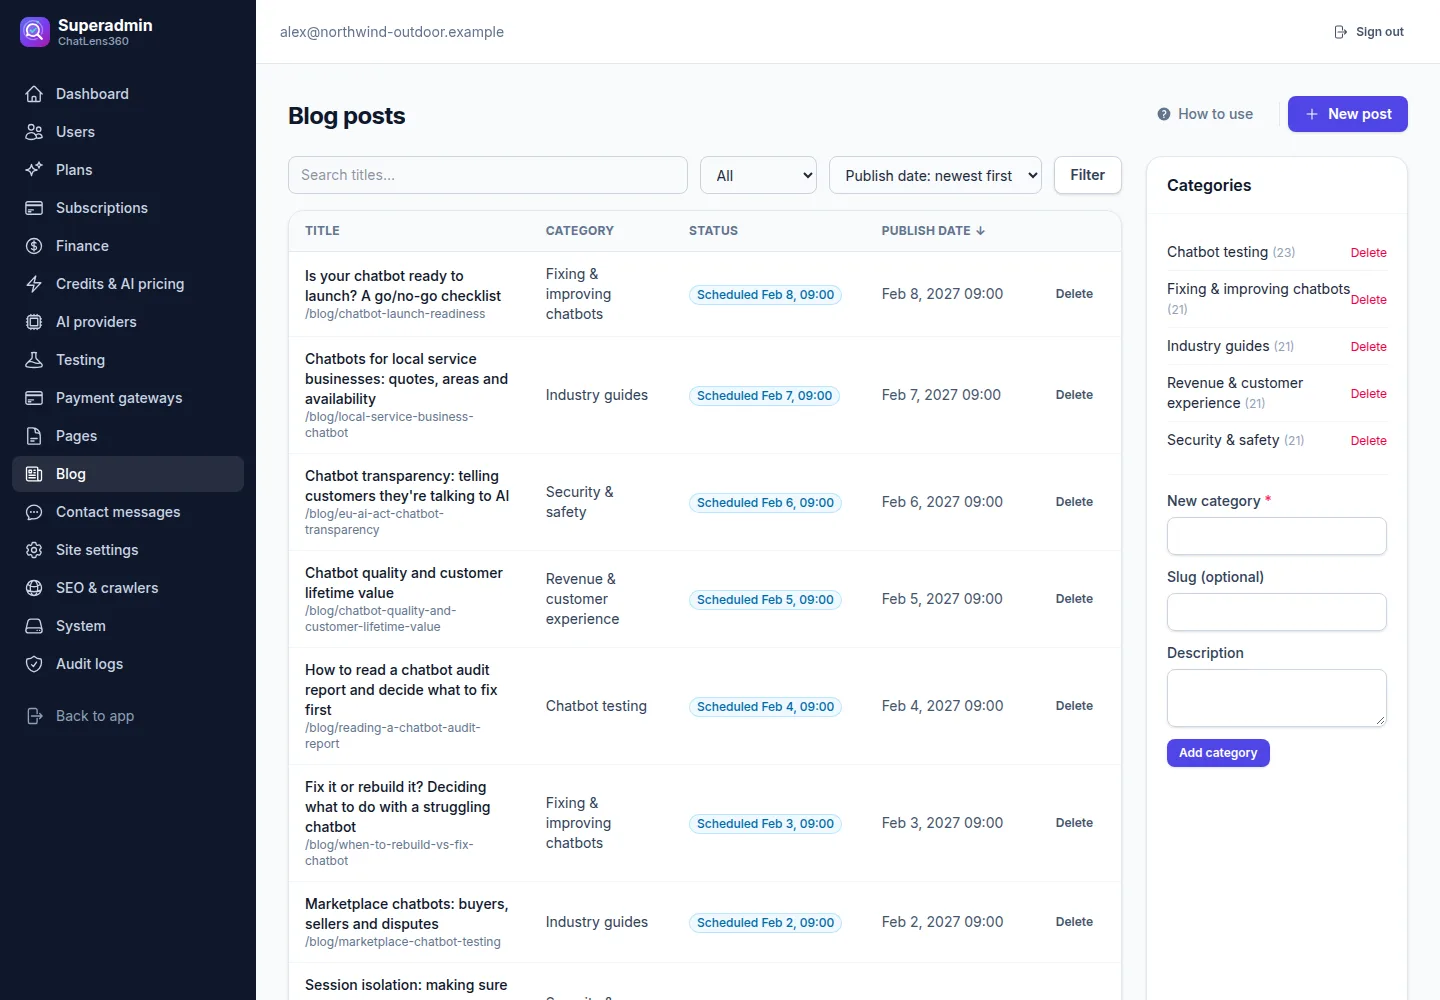
Use the controls above the table to find posts:
- Search titles… to search by title.
- The status menu to show All, Published, Scheduled or Draft posts.
- The sort menu to choose Publish date: newest first or Publish date: oldest first.
Click Filter to apply. You can also click the Publish date column heading to flip between newest and oldest first.
2. Manage categories
In the Categories card, type a New category name, an optional Slug (optional) and Description, then click Add category.
3. Write a post
Click New post and fill in:
- Title: the page headline.
- Slug: the end of the web address. Leave it empty to generate it from the title.
- Excerpt: a one- or two-sentence summary shown in blog listings.
- Content (Markdown): the article. Use
##for section headings, because the title is already the main heading. Raw HTML is removed.
4. Choose when it goes live
In the Publishing card, pick a Status:
- Draft: saved but not public.
- Published: live now. If the post was already published in the past, its original date is kept.
- Scheduled: goes live at the date and time you enter in Publish at. The time zone is shown next to the label.
Scheduled posts are not public, not in the blog listing and not in the sitemap or feeds until their date arrives. They then go live on their own; you do not need to do anything. Pick a Category here too.
5. Add a cover image
In Cover image, upload a JPG, PNG or WebP of up to 2 MB, and fill in Alt text, a short description of the image for screen readers and search engines. Alt text is required when you upload an image. To drop the image, tick Remove image.
If a post has no cover, a branded social preview image is created from its title automatically, so shares on social networks and messengers still look good.
6. Fill in the SEO fields
In the SEO card:
- Meta title (up to 70 characters) and Meta description (up to 300 characters): what search engines show. Leave them empty to use the title and excerpt.
- SEO keywords: comma-separated, main phrase first. Used in the keywords meta tag and the article's structured data.
- Tags: comma-separated, for example
Prompt injection, Knowledge base. Each tag gets its own page at/blog/tag/<slug>. A tag page is listed in the sitemap once it has two live posts.
Click Save post. For a published post, click View at the top to open it on the site.
7. Manage the article library schedule
If your site includes the built-in article library, its posts are already in the list. A few were published at installation, and the rest are scheduled one per day at the same time of day, so the blog keeps growing without any work from you. Each post goes live automatically on its scheduled date.
To change the queue, filter by Scheduled and sort Publish date: oldest first to see what comes next. Edit a post to change its Publish at date, switch it to Draft to hold it back, or set it to Published to release it now. Your changes are kept.
Tips
- Keep publishing steadily. One useful post a day or a week does more for search traffic than many posts at once.
- Write the main search phrase first in SEO keywords and use it naturally in the title and first paragraph.
- Reuse a small set of tags so each tag page collects several posts and becomes worth indexing.
Troubleshooting
- Saving a scheduled post fails: enter a Publish at date, or choose another status.
- The alt text error appears when saving: add Alt text whenever you upload a new cover image.
- A scheduled post is not on the blog yet: check its Publish at date and time zone. It appears as soon as that time has passed.
- A tag page shows "not found": the tag has no live posts yet. It appears once a post with that tag is published.
Related guides
Still stuck? Contact us and we will help, or let our team set it up and fix it for you.